
MORE MOON EVIDENCE-3a
Report #151
November 16, 2008
This two part report is about Moon evidence that may or may not be real. The first part is about general image tampering in the Moon science data. I go to this trouble because you should at least be aware that the credibility of the data in general is often very questionable and so caution is advised in approaching anomalous information within it. The second part will be about some interesting anomalies and then it will be up to you to determine what you think about it all.

 .
.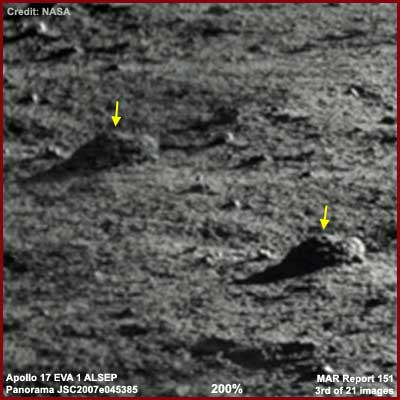
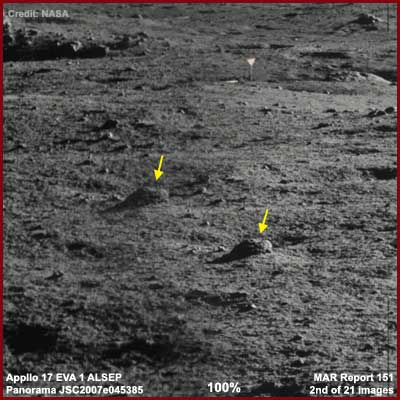
The above first image is a wide Apollo 17 EVA 1 ALSEP panorama image on the Moon demonstrating the context scene with the yellow arrow pointing out the location of the evidence spots in question for any who wish to do a follow-up search behind me on this. The evidence consists of two duplicated identical rocks in the terrain. The left second image shows a 100% full resolution view of the two rocks and the third right image shows a 200% zoom view of the two rocks so that there can be no mistaking that they are identical except for some slight light highlighting differences between them.

 .
.
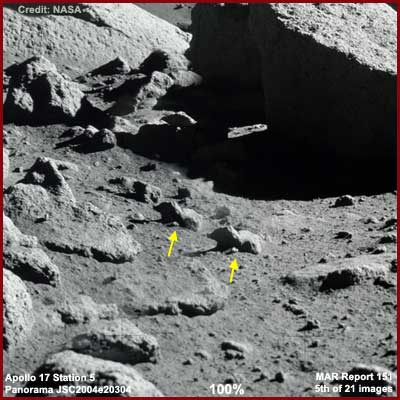
The above fourth image is a wide Apollo
17 Station 5 panorama image on the Moon again demonstrating the context
scene with the yellow arrow pointing out the location of the evidence spot
in question. The evidence once again consists of two duplicated identical
rocks in the terrain when only one is real. Again the fifth left image shows
a 100% full resolution view of the two rocks and the sixth right image shows
the 200% zoom view of the two rocks so that there can be no mistaking that
they are identical and duplicates of each other.
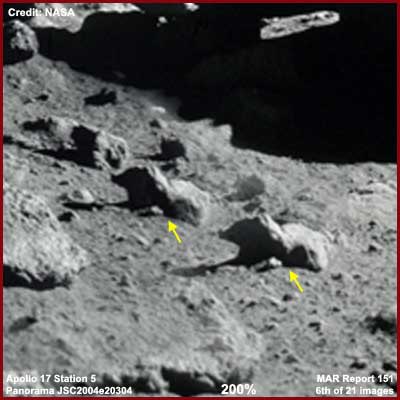
As you can see, these last two objects look a little like rodents don't they.
Note the identical small rocks in the foreground right beside the two "rodents."
Note also the two identical rocks in the background immediately behind the
"rodents." One of these latter rocks may not be immediately apparent
without a closer look because the one of the right is cleverly washed with
sunlight highlights. Yes I'm also aware of the tiny flying sauser looking
object to the immediate left of the "rodent" on the left and make
no issue of it except to acknowledge its presence.
The reason that I'm showing you this twice over is to conclusively demonstrate
that someone at official level has clearly been messing with and in this science
data creating information there that isn't real and that it goes in the official
record in this manner. Further, you should know that this was some very expert
graphics work very difficult to detect except for the recognition factor of
the obvious duplicated rocks. We are just lucky to be able to detect this
at all.
You should know that these panorama images are mosaics of multiple small images
attached together to form the whole. You should also know that the smaller
images producing these particular evidence scenes found here at AS17-147-22552
for the Apollo 17 EVA 1 ALSEP panorama and at
AS17-145-22159
for the Apollo 17 Station 5 panorama do not have
these rock duplications in them. In other words, the duplications and false
data are limited to the wide panorama images and not the source images for
these evidence spots.
Upon reflecftion there is no telling how much of this goes undetected that
does not involve easy recognition rocks. As for myself, I checked only a very
few of the panorama images, quickly ran across this evidence, and did not
look any further because I had the sample evidence I needed to prove my point.
So there are likely more of them to be found.
 .
.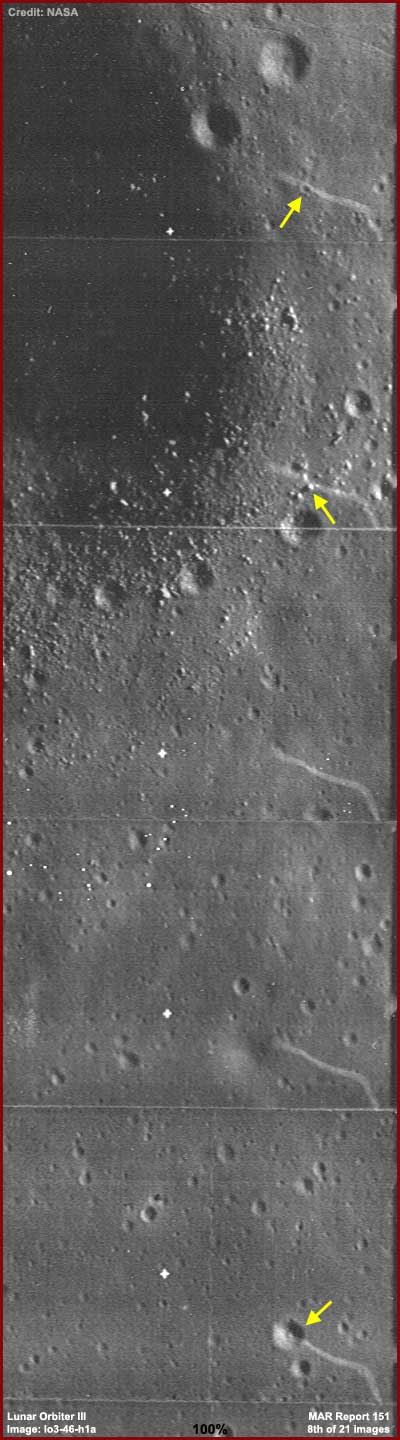
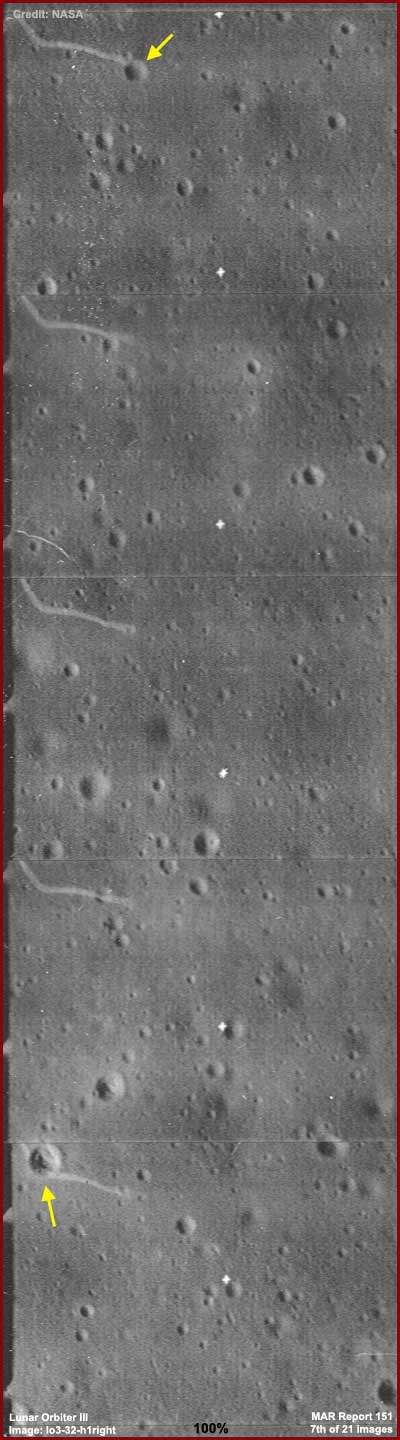
The above seventh image on the left
and eighth image on the right presented at full 100% resolution demonstrate
a unique artifact flaw in the visuals that extends into the image from the
side edge and from the various band lines separating upper and lower bands
in this Lunar Orbiter III science data. These are just representative samples.
This evidence is actually all over the place and plentiful in the data both
as to this particular flaw and many other flaws and duplications not touched
on here in this reporting.
This evidence is very similar in principle to the type of image tampering
evidence reported on in my Report
#149. It shows over a number of bands from two different images what the
artifact looks like untouched by surrounding terrain evidence features as
well as what it looks like where terrain features have impacted and/or distorted
it as pointed out with yellow arrows. It also demonstrates how the same artifact
appears on different sides of these two images and repeats from band to band
in any one image.
When the artifact is distorted or deformed by a terrain feature, this demonstrates
that the terrain is a layer that was added after
the artifact was formed in the film and/or scanning process. If the artifact
had only been introduced after the terrain layer, then the artifact would
be fully formed crossing over the terrain feature without being influenced
in shape by that terrain feature.
When the terrain feature does deform the artifact, this demonstrates that
the terrain is actually a map layer laid down over a preexisting layer containing
the artifact. In other words, first would come the original scene, then the
original image tamper, then the scanning flaw, then the subsequent false layer
laid downover it all. That in turn means that the original scene likely contained
blanketing type image tampering applications of the 1960s and 1970s that would
of have been otherwise too obvious without this recently added false layer
covering over them and blending in with them giving the image visual uniformity.
 .
.
 .
.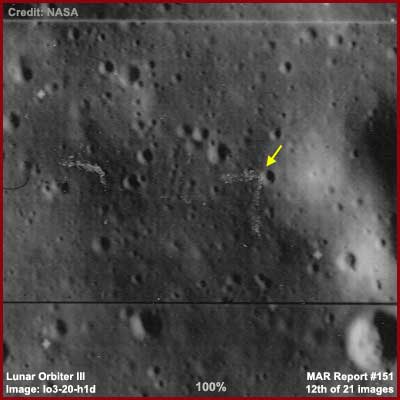
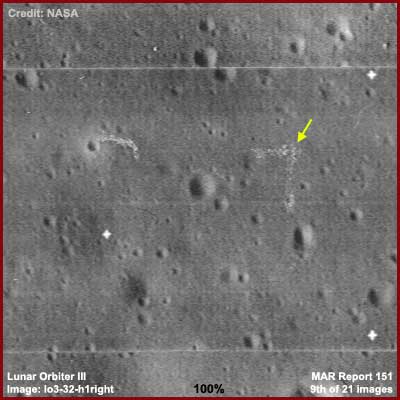
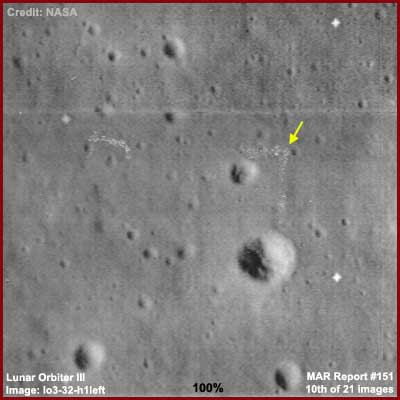
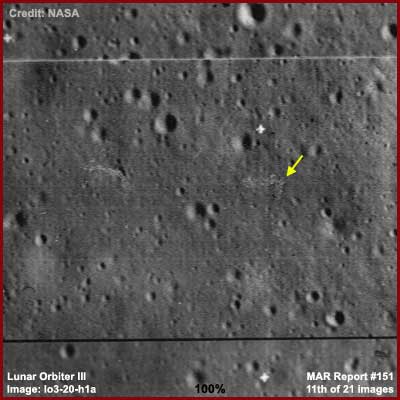
The above ninth through twelfth images
all demonstrate the number seven in the terrain the corner of which is pointed
out in each image by a yellow arrow. Note that these represent four different
Lunar Orbiter III images. Note as well that this is just a small sampling
of this type of evidence and there are many more examples of this with this
"7" in them.
What we have here is the number "7" that has been removed but inadequately
from an earlier information layer below the layer that we see. To the left
of this number you will see a irregular horizontal mark that also appears
repeated in each image in the exact same spot in relation to the number "7.".
This is almost certainly part of another letter or number that was more completely
removed but not quite all of it successfully. There could have also been others
more completely removed.
The reason that the number "7" character looks so spotty and indistinct
to varying degrees from image to image is because an partially opaque (partially
transparent) false layer containing the false impact craters and other terrain
features has been laid down over the earlier scene. The opaque smudge background
of this false upper layer blends in with the previous scene most likely specifically
blending with the heavy and visually obvious smudge applications hiding information
in that earlier scene and adding false terrain detail to visually confuse
the original scene. Of course, since the terrain details of the false layer
varies from image to image, the degree of obscuring the "7" also
varies from image to image.
Who ever did this probably thought that the characters like the number "7"
were sufficiently erased and that the false layer and its confusion detail
would thoroughly cover them over hiding them from view. We are fortunate that
someone's technical incompetency prevailed and allowed this little bit of
number "7" truth to peak/print through to warn us of this maniplative
deceit's presence. Now, with this information in hand, do you have any confidence
that what you are looking is real in the 7th through 12th images above?
That is my point here. The 1960s and 1970s Moon science data have these kind
of credibility problems and extreme caution must be the exercised when trying
to interpret evidence in this data. Why? Because you never know whether you
are looking at something real or not. To complicate it even more, there is
evidence that false anomalous information that is tantalizing but ultimately
never conclusive is also added into the data to spark interest, keep debate
going, and keep the funding money pipes open.
Also, this latter visual obfuscation principle can serve more than one purpose.
There is the one mentioned above but also to confuse legitimate data that
gets through the obfuscation tacticals by mistake. For example, the Moon's
surface is litered with tubing (I'll report on that at another time) both
in long lengths and many shorter piece lengths likely as abandoned debris.
Too much of this type of evidence gets through the obfuscation processes so
the secrecy answer is to add yet more of this kind of evidence mixing it all
together so that they can claim it is all thread, hairs, etc. introduced in
the scanning process. This tactic works just fine on the trusting and that
is the bulk of the population.
In any case, you've been exposed to three different sample types of insight
into the Moon data secrecy obfuscation tacticals in the above reporting that
might give you pause and warning to be cautious. Now you may also have a better
appreciation of what a researcher like myself has to go through in trying
to figure what may be real and what isn't in this data. I've presented this
side of this credibility and trust issue because the trusting side is already
long established and does not require its side to be presented here. Now,
with this exposure and its note of caution, let's get on with some anomaly
evidence in the next Part-2 of this report at the link below.
DOCUMENTATION
All report imaging here has been drawn from the large
.tif images available
at each of the links below.
http://www.lpi.usra.edu/resources/apollopanoramas
: Scroll down about mid-way on the page of panorama thumbnails to the Apollo
17 section. There click on the third thumbnail image from the top which is
the "Apollo 17 EVA 1 View from ALSEP Station"
that is the source of my 1st, 2nd, and 3rd images in this report. Next click
on the eighth thumbnail image from the top which is the "Apollo
17 Station 5" that is the source of my 4th, 5th and 6th images
in this report.
http://ser.sese.asu.edu/LO/lo3-32-h1right.html:
This link accesses the official Lunar Orbiter III lo3-32-h1right
science data image that is the source of the 7th and 9th image evidence here
in this reporting.
http://ser.sese.asu.edu/LO/lo3-46-h1a.html:
This link accesses the official Lunar Orbiter III lo3-46-h1a
science data image that is the source of the 8th image evidence here in this
reporting.
http://ser.sese.asu.edu/LO/lo3-32-h1left.html:
This link accesses the official Lunar Orbiter III lo3-32-h1left
science data image that is the source of the 10th image evidence here in this
reporting.
http://ser.sese.asu.edu/LO/lo3-20-h1a.html:
This link accesses the official Lunar Orbiter III lo3-20-h1a
science data image that is the source of the 11th image evidence here in this
reporting.
http://ser.sese.asu.edu/LO/lo3-20-h1d.html
: This link accesses the official Lunar Orbiter III lo3-20-h1d
science data image that is the source of the 12th image evidence here in this
reporting.
![]()