
VIKING TAMPERING EVIDENCE
Report #054
September 20, 2003
can be contacted at
My goal in this report is only to try to bring awareness to more of you that image tampering exist at all in the satellite imaging as well as try to demonstrate just how long it has existed since it most definitely is not a new thing. If you can see more than that here, then so much the better. To that end, I've picked some of the most obvious tampering that just about everyone should be able to readily recognize, at least on the coarsest levels, and we're starting off with 23+ year old Viking Orbiter image tampering dating back into the 1970s and early 1980s.
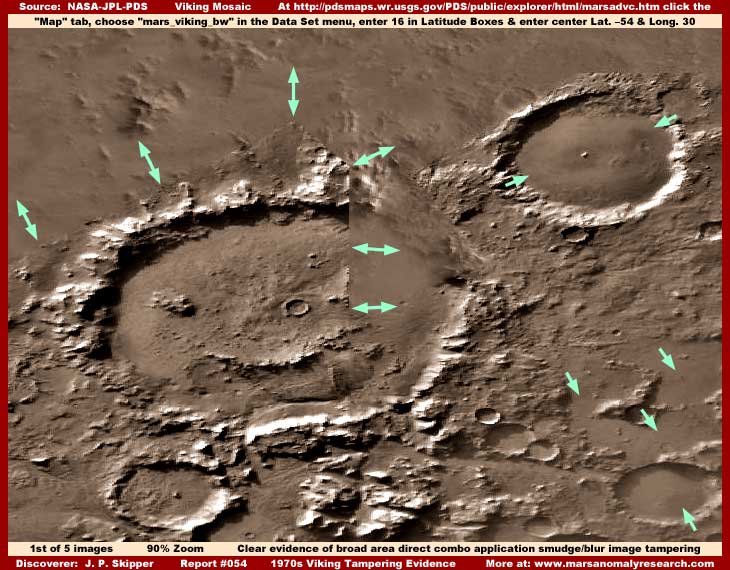
In the first image above and on the right side of the larger crater, you can clearly see as pointed out with green arrows the two different tampering fields separated by a very sharp division line. To the right of the division line is demonstrated the coarsest and most obvious smudge/blur combo tampering coating application creating a smooth texture featureless slightly translucent appearance that obviously doesn't belong in this geology and to the left of the division line is more fine detailed appearing terrain.
Note to that the sharp demarcation line clearly extends up over and beyond the crater rim changing angle three times and running back to our left as a splice line in the terrain just above the crater. This particular kind of tampering as revealed by the demarcation line is about as coarse and obvious as it gets. The main thing I want you to get out of this is not only to learn to recognize the coating application itself on the right side of the demarcation line but also its less obvious presence in other areas of this site.
Once you are able to recognize the smoother smudge/blur tampering texture to the right of the sharp demarcation line in the large crater for what it is, now we can drill down a little further into less obvious tampering. Look in the upper right corner of the image and down inside the smaller crater. The view of the entire center of this crater and it floor has been completely obliterated hiding something there by a round swirling pattern of this same type of tampering application leaving only the top tip of probably a hill sticking out of the center of it reflecting a little sunlight. Once you can see the strong similarity with the smudge tampering so clearly evidenced in the larger crater, then this in the smaller crater also becomes obvious.
By the way, there are many smaller craters in this area and most of them have their center areas obliterated by this same tampering technique. Further, this same tampering application is very prevalent in the general terrain all around this site and especially in the terrain above the craters seen here but less obvious there because it just maps around in the terrain lowlands following land contours. But note that it also leaves the tops of the highlands and ridges sticking out of it to provide some detail to partially offset the more obvious smoothing featureless effect and drawing attention to itself.
These broad area tampering application fields are obvious once pointed out but smaller less well defined areas are not nearly as obvious. As an example of this, take a look now at the smaller crater in the lower right corner of the above image. Its center has also been obliterated with a slightly lighter application of this same technique but here the crater rim darker shadow has been reintroduced over the top of the tampering to help it look more authentic. Now that's tricky isn't it.
Even less obvious is that this same application has been applied in the terrain adjacent to and just above the small crater in the lower right corner of the image as pointed out by arrows. It maps in the lowlands around elevated hills and ridges leaving the tops of them exposed to provide some detail and a more realistic terrain appearance but the fact is that this area of terrain has also been thoroughly sanitize of just about anything real. Look very closely and you will see this in other nearby areas as well. Once pointed out, unless you believe that smooth featureless ground hugging dark fog or smoke exists all over Mars in broad areas like these, the smudge tampering applications are evident and especially when you compare the tampering's smoothed out featureless look with nearby more tiny detailed terrain.
The tampering embedded in the general terrain over very broad areas has multiple purposes. One is of course to hide and relegate specific evidence to secrecy. However, you can't put blobs of coatings on patches of natural terrain and leave the rest of the natural rugged terrain detail alone without quickly drawing attention to the smoothed blob of evidence covering coating itself. So, the idea is to spread a variety of tampering application coatings over wide areas to give it a visual universal quality so that the real blobs of evidence covering coatings blend in and do not stand out in this general background.
Additionally, when not immediately recognized for what it is, the universal quality of general wide area coatings like this subtly trains the average viewer's mental expectations of what to expect visually out of the Mars satellite imaging. If all that you see is crummy vague diffuse artificial detail and the lack of any natural geological detail, then this becomes your standard comparison frame of reference and all you expect to see is this. This equates directly to viewers not being disappointed with the lack of detail and in turn not questioning the authenticity of what it is they're seeing.
However, as we drill down into more subtle tampering forms making it more complex to interpret, you should be aware that these broad areas of tampering and the smaller area applications have not all been applied at the same resolution. The smaller areas have been worked over in much closer resolutions than that released to the public. The pre-mapping and then later reinstalling of the shadows over the smudge tampering applications, even with computers, can only be done this well at much closer resolutions.
At the time this was being done in the mid to late 1970s in the Viking imaging, it appears that the broader tampering applications could not practically recreate these shadows. For example, in the larger crater in my first image here, note that the broad and obvious smudge/blur application in the right side of the crater and to the right of the sharp demarcation line obliterates not only the natural crater rim geology there but also the crater rim dark shadow thrown in this area as well with no attempt to recreate it.
Likewise the whole of the terrain in the top of my first image from the upper crater rims on up in the image has been worked over with this same smudge application forming a general wide area application field. It follows the contours of the land covering everything in the lowlands and leaving only the tops of the highlands out to provide a little detail trying not to draw attention to itself. This illusion would have normally been much more effectively blended into this scene had it not been for the arrow straight splice demarcation line there separating two different images joined together of the same scene but with different treatments on them.
You see, the Viking imaging was characterized by small strips that were pieced together to form a larger over-all view made up of a mosaic of these pieces. The problem for the secrecy types was that most of the tampering was conducted on the smaller individual pieces before they were combined together and this was done at different resolutions and with different tampering applications. When a piece with one type of tampering on it was carelessly combined up against another piece with a different kind of tampering on it, you wind up with these sharp and very obvious demarcation splice lines between the two pieces revealing the different tampering application fields not matching up and thereby drawing obvious attention to itself.
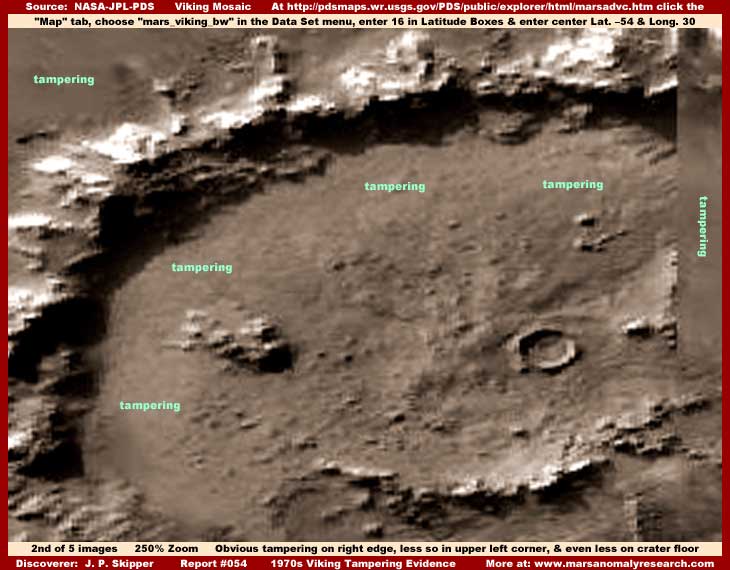
However, again in this drill down method from the most to the least obvious, the least obvious direct tampering application is demonstrated in my above second image providing a much closer 250% view of the largest crater's interior floor. Note the tampering areas that I've labeled with green text. This is the most difficult type of tampering to see and recognize in this particular imaging. This is especially true at the normal distant resolutions provided in the official science data.
The tampering areas pointed out in the above second image is the same smudge type tampering application but applied in a tighter dithering pattern and done at a far closer resolution. When you draw back to the normal official resolution, this dithering pattern blends together visually and provides a slight bit of texture to the tampering surface helping to mimic level ground geological detail. This illusion holds up well unless inspected very closely at a significant zoom in factor such as you see here. Even then it takes a practiced eye to see it. The main clue that this is tampering application is that it to is essentially featureless without any real geological detail where it has been applied.
This difficult to recognize much finer layer of tampering has been applied at a much closer resolution than released to the public. You can also see small applications of this intricately intermixed with crater rim structures and down in between them in small patches. This again demonstrates that much closer resolution imaging than that released to the scientists and public exists and that what has been officially released is only a poorer resolution heavily tampered with copy of the real original imaging.
On the right edge of the image, you can again see a portion of the super obvious razor sharp demarcation line of the broader area application applied at a much courser resolution closer to that released to the public. Notice that it is partially translucent indicating that it is a combination of smudge and blur treatment. Notice to how this coating sharply cuts off the crater rim dark shadow that may itself have been a artificial recreation done at closer resolution.
The point I'm trying to make here is that the most obvious course broad area tampering I've pointed out here is not the only tampering application present in this scene. The tampering in and around this crater has been applied in multiple layers and in multiple layers at different degrees of resolution. The coarsest broader applications are very obvious but, as you can see, they are only the tip of the tampering iceberg so to speak and you have to look much closer to really understand the rest of what is happening.
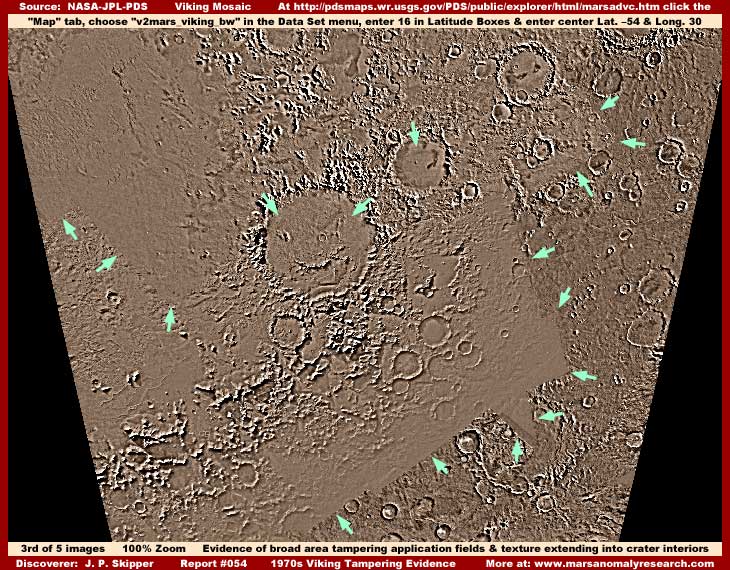
In my above third image I've now drawn back out to show a very wide field of view around the craters and you can see the obvious sharp demarcation line pointed out by my arrows dividing a smoother appearing broad tampering application field from the more detailed appearing terrain immediately south of and adjacent to it. This colorized image does a fairly decent job of showing the different coating textures and division lines between them.
Take special note of the obvious smooth texture of the tamper coating in the center area within its sharp splice demarcation lines. Then compare that with the texture inside the larger crater as well as the smaller crater to the immediate right of it. Obviously they are the same texture clearly demonstrating the presence of the image tampering coating within both the larger and smaller craters matching the same coating in the general wide area around the craters.
Again, note that the crater rim tops and other highlands are essentially left out of this smooth obscuring coating while all the lowlands are covered up clearly demonstrating that this is not some universal camera artifact or software problem covering everything. Why? Because it is obviously very selective in its application carefully mapping in the lowlands while leaving the highlands out. That in turn demonstrates that this is a application by intent and purpose by design and not some glitch of some kind.
If the application fields had been continuously applied without the mismatched mosaic pieces demonstrating the sharp demarcation break lines between the tampering fields and in so doing accentuating their differences, this would have been harder to recognize. But, the differences in the application fields are accentuated and obvious, so how could image tampering as obvious as this be missed by the scientists?
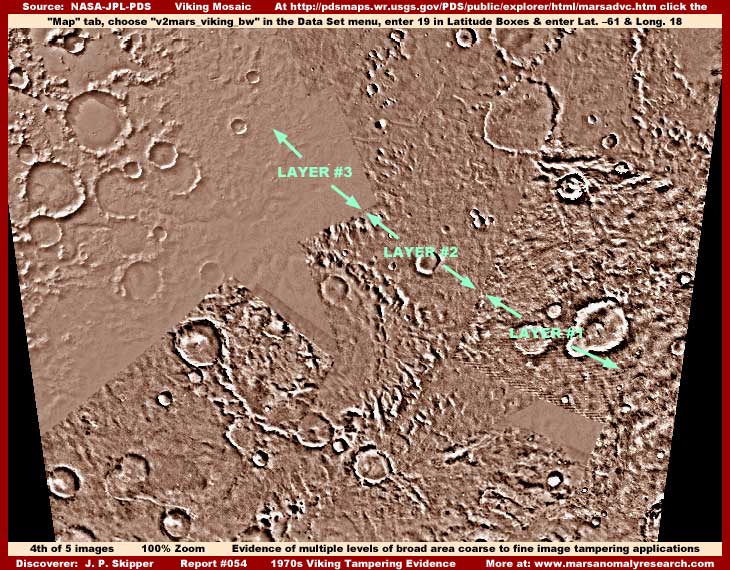
In my third image, note the projection sticking out of the bottom of the smooth tampering field in the lower right portion of the image as pointed out by two arrows. Now in my above fourth image providing a closer view of this area, you can see this area demonstrates several different layers of tampering overlaid on top of each other with the top smoother layer being the most obvious while the lower layers are increasingly more grainy appearing and increasingly less obvious.
In the left upper area of the my fourth image is demonstrated the smooth featureless third and top application layer done at relatively coarse resolution close to that released to the public within its own very obvious perimeter boarder demarcation line. Below and sticking out from under that to our right is a still relatively smooth second layer application but done in a dithering pattern at a closer resolution that also gives it a bit of a grainy texture look normally harder to recognize as tampering but you can clearly see the demarcation line identifying this layer's edge boundaries. Below and sticking out from under that to our right is yet another sub-layer done at a even closer resolution providing an even more grainy and therefore more detailed appearance at this resolution.
In other words, there are layers upon layers of tampering here and almost no true ground geology is visible at all except for the tops of some highlands.
But, that still isn't all. Even at this distant view there is some very telling tampering evidence is inside the larger crater itself. Look closely in my third image here and you will see that the crater rim shadow thrown inside the crater on its floor, as clearly demonstrated in my first and second images here, is now completely missing. Close examination reveals that this tampering application is different in that it spreads wider on the crater floor encompassing most the shadow except for a tiny thin line.
The tampering in this image has obviously completely covered the shadow in the large crater as well as most nearby others. Further, the most obvious of all tampering in the right side of the large crater as demonstrated in my first and second images here is completely different offering a grainy blended in appearance and with no sharp dividing line separating the tampering fields.
This is because PDS/USGS offers two different data sets of Viking imaging based on Viking Orbiter 1 and Viking Orbiter 2 images. The default data set in their search engine is identified as "v2mars_viking_bw" and with this you get the type of lighter color grainy texture tamper imaging demonstrated in my third and fourth images. The optional choice data set is identified as "mars_viking_bw" and with this you get the type of smoother fluffy tamper imaging demonstrated in my first, second and fifth images here.
You're probably now beginning to get the picture. Because the basic geology of the craters obviously didn't change and lighting direction difference are minimal between the camera shots, the difference can only be adequately explained by digital manipulation of the imaging. The tampering evidence is itself completely different between these two data sets. This clearly demonstrates that different tampering sets of images exist. That also demonstrates that both sets are copies and clearly not the originals. That in turn demonstrates that the true original science data has never been made available to the public or scientists.
Obviously, different people have been doing different tampering in different copies of the original imaging and at different resolution levels and submitting multiples of these tampered with different copies for release to the public and scientists as though they were the originals. You can bet that the true originals, even in this 1970s data, offers a far closer and many times clearer view of Mars and what is on its surface than these crummy quality manipulated images in either data set that have been pawned off on us all as the true originals.
Further, it stands to reason to. Even back in the 1960s and 1970s when the Viking missions were being planned and then executed, it is well known that military intelligence had satellite imaging far far more capable than what is being presented in the Viking imaging. Considering the huge cost and amount of long term planning commitments that must go into one of these probe mapping missions to Mars, it just doesn't make any logical sense that NASA and especially JPL so heavily influence by military intelligence, would send any camera systems to orbit Mars that were anything less than some of the best that we had at that time
Further, don't forget that the images should be even better than satellite imaging here on Earth because there is little to no cloud cover on Mars to occlude the view. Yet, look at these Viking images here. Even enhanced to maximize clarity and in the more detailed areas, they show hardly any real detail of even the most gigantic of objects many miles across. If that isn't bad enough, these images are obviously further worked over by image tampering applications to eliminate even more detail. Is this acceptable to you?
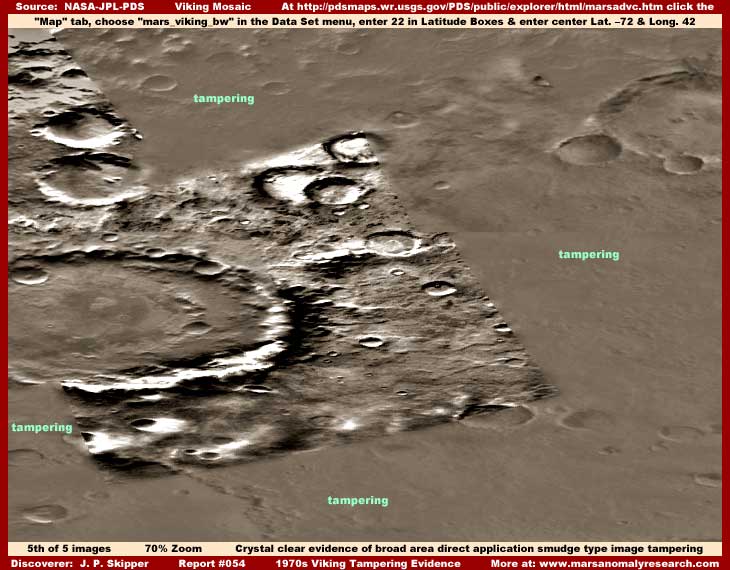
My above fifth and last image is a representative sample of very broad area tampering fields that have effectively sanitized large terrain areas. These fields have been done at a coarser resolution close to that released to the public and scientists.
When applied over such large areas, this type of tampering application should have been extremely obvious to scientists in the 1970s because the smooth coated areas have a complete absence of shadows and no smaller to midsize detail at all. However, the presence of super obvious spot areas like this with the sharp arrow straight splice demarcation lines separating the smoother almost featureless areas from the grainy more detailed appearing and brighter reflective terrain areas should have insured full recognition of the tampering fields by even the most naive and unquestioning scientists.
Obviously, doing different tampering applications on small mosaic pieces and at different resolution levels meant that keeping them all organized and then splicing them together properly with matching tampering applications adjacent to each other was an error prone process to say the least and a nightmare for whoever did this back then. Even if you just fell off of a turnip truck, you can still see the obvious tampering in this one. It's just hard to imagine getting more obvious than this.
However, don't get confident that the bright center more detailed area surrounded by the obvious featureless image tampering coating does itself represent any true natural geology. In fact, it has also been heavily tampered with but on a tiny scale indicating that it was done at much closer resolution than officially released to the public and scientists.
Just in case you might wish to think that this type of very obvious tampering evidence is something rare in the Viking Orbiter imaging and easy to miss by 1970s scientists, better think again. The images here in this report are just representative samples just to enable bringing this kind of evidence to your attention. If you're interested in pursuing it, following is a list of a dozen more representative examples of Viking images for your examination all of which have this type of very obvious evidence in them and any one of which should have triggered suspicion, questions and debate. These are by no means all of them, only some from a limited area on Mars.
(01) ... MG60S063 ... at ... Latitude -62.5 to -57.5 — Longitude 59.97813 to 66.66667
(02) ... MG65S045 ... at ... Latitude -67.5 to -62.5 — Longitude 39.98373 to 50.00000
(03) ... MG65S065 ... at ... Latitude -67.5 to -62.5 — Longitude 59.98373 to 70.00000
(04) ... MG65S055 ... at ... Latitude -67.5 to -62.5 — Longitude 49.98373 to 60.00000
(05) ... MG70S035 ... at ... Latitude -72.5 to -67.5 — Longitude 29.95580 to 40.00000
(06) ... MG65S005 ... at ... Latitude -67.5 to -62.5 — Longitude 359.98373 to 10.0000
(07) ... MG55S050 ... at ... Latitude -57.5 to -52.5 — Longitude 46.65995 to 53.33334
(08) ... MG65S035 ... at ... Latitude -67.5 to -62.5 — Longitude 29.98373 to 40.00000
(09) ... MG75S040 ... at ... Latitude -82.5 to -67.5 — Longitude 19.82319 to 60.00000
(10) ... MG60S043 ... at ... Latitude -62.5 to -57.5 — Longitude 39.97813 to 46.66667
(11) ... MG70S045 ... at ... Latitude -72.5 to -67.5 — Longitude 39.95580 to 50.00000
(12) ... MG65S015 ... at ... Latitude -67.5 to -62.5 — Longitude 9.98373 to 20.00000
Caution! Some of the above listed image ID numbers on the left in the list are mistakenly mislabeled at official level starting off with the first two letters of "MI..." instead of the correct "MG..." designation. If you use "MI..." in the PDS/USGS search engines, it will not work. Use only the "MG..." designation. Those above that have been effected by this mislabeling have been corrected by me and tested to work in the search engine.
Unlike the more recent and better organized MGS MOC imaging at MSSS, this older Viking imaging from the 1970s is not nearly as easily accessible at PDS. You have to jump through some hoops to get at what you want by going through proprietary search engines. Following are the instructions to access the above dozen listed images via one of the search engines.
Access http://www-pdsimage.jpl.nasa.gov/cgi-bin/msearch.pl: Don't use the form you see on the opening page. Rather, on that page click on the "Map" tab near the top. On the subsequent page that comes up, now its time to use this form to find any one of the above images. At the top of the form, enter which ever of the above image ID numbers you select and then under that enter the full coordinates range for that image in just as you see them above. Be sure to enter the full Latitude and Longitude coordinate number pairs from left to right in the same order that they appear in the list above. Also, in each of the Latitude coordinates, be sure to include the minus sign out in front of each number or the search engine will deliver imaging from the northern hemisphere.
Note that this search engine accesses only fixed images that cannot be manipulated in this data base but still clearly shows the tampering. To zoom in etc. and see the tampering even better, you will either have to download them and view them in a graphics program or look them up via their center coordinates in the search engine indicated in my "Documentation" section below.
WHERE ARE THE SCIENTISTS?
So, if there is so much of this very obvious tampering in the Viking Orbiter satellite imaging, why haven't the scientists picked up on this at some point over the decades since the 1970s? Why is this only now being brought to attention and by someone outside their community with theoretically less expertise? Why haven't they as the "experts" long ago made an issue of this?
You'll have to ask them the reason for that because I find it incredible as well! I could possibly understand how in they might perhaps not be able to recognize the harder to see finer detail tampering done at closer resolutions but this coarse broad area tampering is just so super obvious and it is just inexplicable how they could miss identifying this for what it clearly is. You have to wonder if they every really look at this imaging data at all or not, must less closely?
Likewise, although they might try proffering up such an excuse, the tampering you see here in this imaging cannot be characterized as camera or image processing artifacts/defects or differences between the different camera systems used in the Viking imaging. The way the smooth featureless smudge/blur tampering coatings map to fit perfectly inside craters and maps to fit itself carefully in open lowlands leaving the tops of highland objects, such as crater rim and hill tops, out to be seen does clearly indicate intent and purpose by design rather than being the result of any kind of unfortunate fortuitous or chance situation.
Further, as you can see in the imaging in this report as well as any of the dozen other sample images you care to investigate, the smooth smudge tampering coating essentially eliminates all but the largest and coarsest geological detail. Even if the scientists are unable to recognize the tampering applications for what they are, what group of scientists or academics could accept this kind of super poor imaging detail alone and not set up a racket about it?
How can they look at this smooth featureless coating so devoid of normal geological detail or really any detail of any kind (gets even worse the closer you look at it) and mistake that for real surface geology? Yet, that appears to be what has happened and not a peep out of them that I know of. It boggles the mind and carries the concept of inexplicable all the way out to a entirely new level, to put it mildly. Someone appears to have been caught sleeping on the job.
WHAT DOES IT ALL MEAN?
Image tampering isn't important if you have no wish to know the truth. But, if real knowledge and truth are important to you, then this information on image tampering is critically important. As I have stated a number of times, there can be no adequate understanding of what is really on Mars with all of its implications without first understanding this image tampering business, its purpose, and its implications.
The basic concept is this, image tampering is itself powerful evidence and once one begins to recognize and understand that the image tampering exists, then the next logical step is to understand that it occurs for a specific purpose. Logically that purpose is to hide evidence of some kind and relegate that evidence to secrecy where its existence is known only to a select few. But why are they so afraid of whatever this is getting out and into the public's perception?
The question then becomes what information/evidence could be so important, dramatic, and/or traumatizing that it would be worthy of a expensive, determined, and sustained secrecy commitment from at least the 1970s to the present? As important as it is, logically rocks, water, or even plant or animal life just doesn't qualify enough for this kind of secrecy commitment sustained for decades.
Also, neither does old defunct civilization evidence no matter how important or valuable a resource it might one day be. You'll notice that no one at official level that might be in the know is in any apparent hurry to get manned missions to Mars and that in spite of a large segment of the science community that is applying pressure for it. However, very significantly, they continue to be very much interested in sending what amounts to covert surveillance and intelligence gathering equipment to the planet.
In my opinion, logically the only information worthy of this degree of secrecy commitment and investment, is active living civilization evidence and likely an awful lot of it and on an advanced level. Further, the anomaly evidence in the Mars imaging that has both been sanitized out of the imaging in part or in whole as well as some small amounts that have escaped this process and have been presented at this website confirm this assessment.
Those in the know are rightfully concerned about this alien (alien is perhaps not the most accurate term to use) reality but even more concerned as to the world population's ability to adapt successfully to this knowledge without the basic structure of society coming under too much negative stress. After all, there are millions and billions of us out here in the world and we come in such a great variety. Some of us want to know and some of us don't. Some of us can handle knowledge gained and adapt but some of us would have a lot of trouble with this.
The implications of this reality becoming universally known can not be understated or underestimated. So they are caught in between the rock and the hard place here on this issue and it's very hard to know just what to do. They've bought adaptation time for themselves with the secrecy but the effective life of that secrecy is rapidly coming to an end and universal knowledge of this is inevitable. The sanitizing process is of course imperfect and so the unraveling has already begun as per evidence like that you see here at this website.
We are not entering a new Age here, rather we have already entered this new Age and are just now beginning in the smallest way to wake up and perceive the reality of what has already happened to us. What this perception of the new reality does to us is up to us and how we handle it and ourselves. Do we just emotionally react and plunge ourselves into needless problems of our own making or do we act rationally and positively upon ourselves and our new environment? The choice is ours.
So far the flexibility to adapt has brought us as a species successfully out of the distant primordial mists of the past. Let's hope and be determined that we can do this again one more time.
SUMMARY POINTS
(1) Evidence demonstrates that the Mars Viking Orbiter science data is full of image tampering.
(2) Evidence demonstrates that tampering in Mars satellite data exists as far back as the 1970s.
(3) Multiple layers of tampering demonstrates that the tampering is very heavy in its application.
(4) Wide broad tampering areas demonstrates that the tampering is universal in its application.
(5) Tampering in Mars satellite imaging confirms secrecy and that there is something to hide.
(6) The high degree of tampering confirms that there is a great deal of whatever is being hidden.
(7) So much investment in secrecy confirms that whatever is being hidden is powerful evidence.
(8) Active civilization is likely the only evidence powerful enough to warrant such sustained secrecy.
(9) Such sustained long term secrecy says that we are not trusted to be able to handle this info.
DOCUMENTATION
As I stated above, the Viking imaging at PDS is not simple to access and requires jumping through some hoops to get at a particular image. Unfortunately, linking to a opened image doesn't work or I would have provided a direct link to it here. One must access an image through a search process as described below.
http://pdsmaps.wr.usgs.gov/PDS/public/explorer/html/marsadvc.htm: Use this link as the primary access forms search engine for the official science data source for all four of my images here in this report. Here in this search engine results you can manipulate the the resulting imaging by zooming in and out as well as panning up and down and side to side.
To duplicate my first and second images, in the displayed form on the left side in the Data Set section choose "mars_viking_bw" from the drop down menu. Then enter "16" in both Latitude boxes on the right. Then enter "-54" in the Center Latitude box and "30" in the Center Longitude box and leave all other fields as they are. Then click on the Submit button at the bottom of the form and an image centered on the larger and smaller crater will come up. To zoom in closer on the larger crater, just click on the paddle icon below the image with the "+" sign in it.
To duplicate my third image, in the displayed form on the left side in the Data Set section choose "v2mars_viking_bw" from the drop down menu. Then enter "16" in both Latitude boxes on the right. Then enter "-54" in the Center Latitude box and "30" in the Center Longitude box and leave the other fields as they are. Then click on the Submit button at the bottom of the form and an image centered on the larger and smaller crater will come up just as above but now with different visual qualities in the scene because it is from a different data set.
To duplicate my fourth image, in the displayed form on the left side in the Data Set section choose "v2mars_viking_bw" from the drop down menu. Then enter "19" in both Latitude boxes on the right. Then enter -61 in the Center Latitude box and "18" in the Center Longitude box and leave the other fields as they are. Then click on the Submit button at the bottom of the form and an image centered on the multiple layered tampering fields junction area will come up.
To duplicate my fifth image, in the displayed form on the left side in the Data Set section choose "mars_viking_bw" from the drop down menu. Then enter "22" in both Latitude boxes on the right. Then enter "-72" in the Center Latitude box and "42" in the Center Longitude box and leave the other fields as they are. Then click on the Submit button at the bottom of the form and an image centered on and expanded wide enough to encompass the evidence scene will come up.
NOTE: This search engine with its image manipulation features can also be used to access the dozen sample images listed above. However, this engine differs in that it uses a single center Latitude and Longitude input rather than a range of coordinates. Just find the center point between each range coordinate and use that as your center coordinate.
, Investigator
![]()